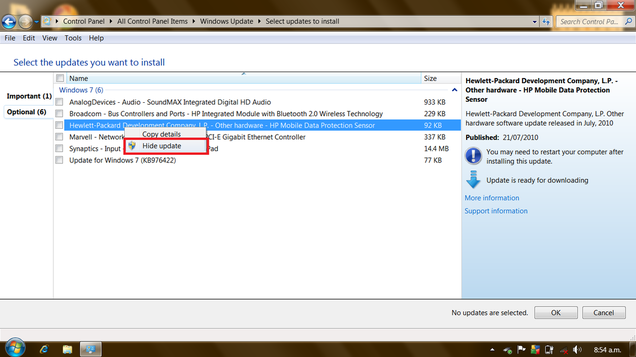
If you choose not to download and install an update, it’s available for you the next time you visit Windows Update…and the next time, and the time after that as well. You might have a good reason for not accepting a particular update—perhaps it makes improvements to a Windows feature you never use—and there’s no reason it should clutter your list of available updates.
To remove an item from the list without installing it, you hide it. This is a pretty easy trick, but the option for hiding updates in the list is itself somewhat hidden and often goes overlooked.
In the list of available updates, right-click any update that you don’t want to see again, and choose Hide Update. If you later change your mind—or if you just want to see a list of the updates you’ve chosen to hide—on the main Windows Update page, click Restore Hidden Updates.
Ever thought you don't have enough space on your desktop? Here is your solution, a 3D 6 sided cube that allows you to have 6 different desktops.
Demonstration of Desktop Cube Download Instructions
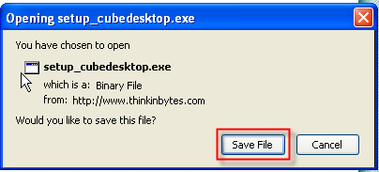
Navigate to this website: http://www.soft82.com/download/windows/cubedesktop/ Click on the Free DownloadSince we are using Firefox as our web browser we need to save the file, the box below will display click on Save File
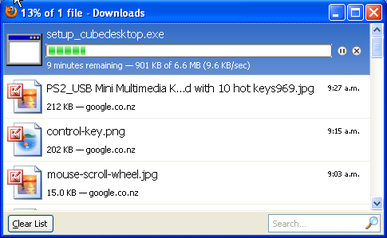
The saving dialog box below will display usually in the top left of the screen. This shows the time it takes to save the .exe (executable file).
Once the file has finished saving the image below will be visible
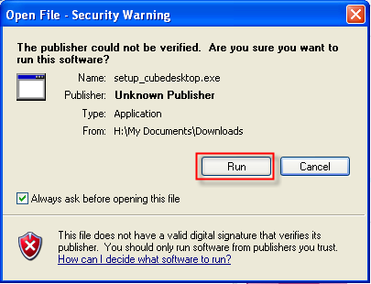
Double click on the setup_cubedesktop.exe
The run box below will display, Click on Run
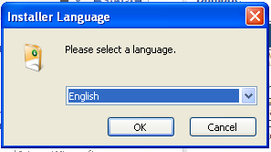
You now need to select the language you wish to use. Click Ok
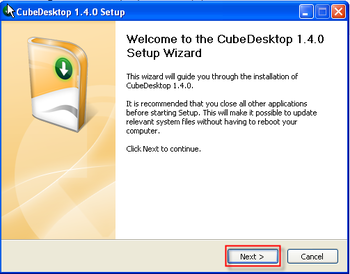
The install Wizard will now open as shown below, click on Next
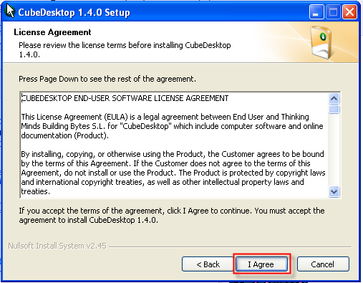
Please read the terms and conditions and click I Agree
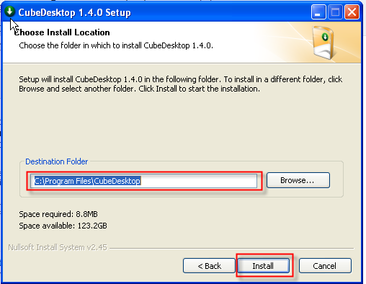
Select the destination for the file to be saved and click install
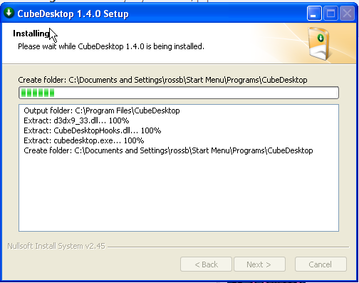
The install progress box will appear below
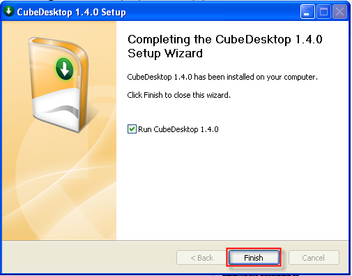
Click Finish and your 3D cube desktop trial will start
You will notice the 6 buttons appear on your Taskbar
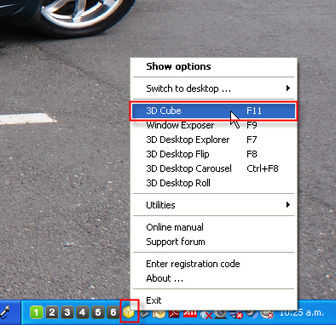
To change the view of your cube, right click on the yellow cube on your taskbar and click 3D cube you desktop will change to the below image.
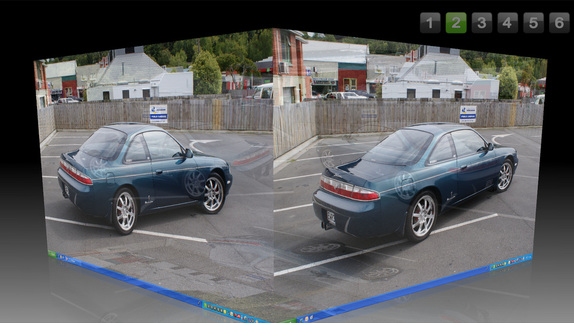
3D Desktop Cube
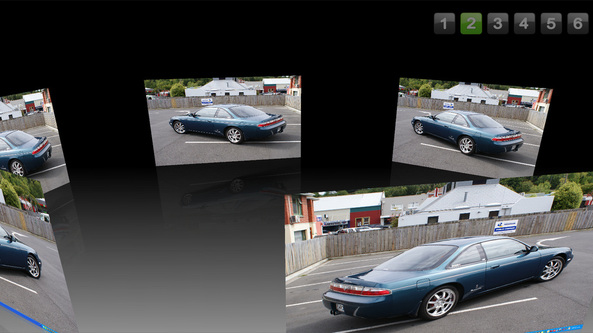
Here are two other views you can use with 3D cube desktop
3D Desktop Flip
3D Desktop Carousel
You can click and hold you mouse button down to drag to different desktops, There are many customizing tools with this 3D desktop cube. You can set individual backgrounds to each desktop and have different Icons on each desktop also. However as this is a trial you will need to purchase the full version to experience all functionality for an extended period of time.
Do you ever have trouble with the size of images and text in a website?
Here is an easy trick to fix that.
Keyboard & Mouse Combination
 Press the Ctrl key on your keyboard wilst your web browser open and hold the Ctrl key down
 Using the scroll wheel on your mouse scroll forward to zoom in and scroll backwards to zoom out
Keyboard only
You can also do this by using just the keyboard.
 Press the Ctrl key on your keyboard wilst your web browser open and hold the Ctrl key down
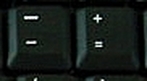 Press either - or + to zoom in or out
Zooming Out
Zooming In
You don't need fancy software to make sure that your Windows PC is running smoothly.
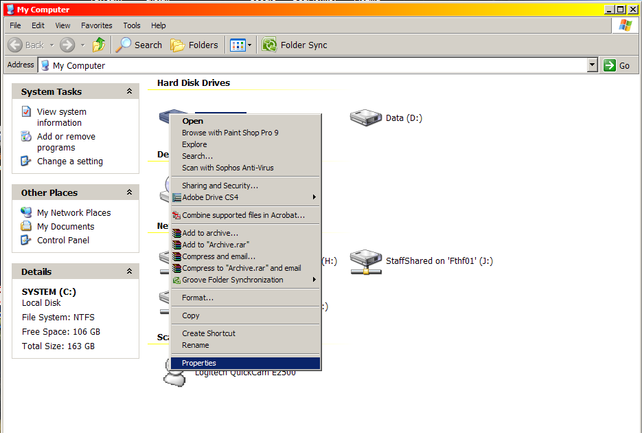
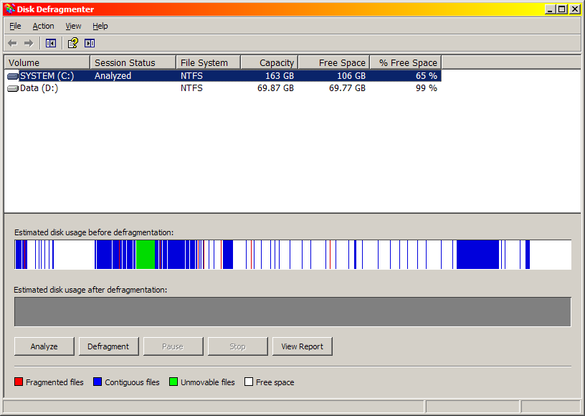
Open My Computer. Right-click on the hard drive icon and choose Properties
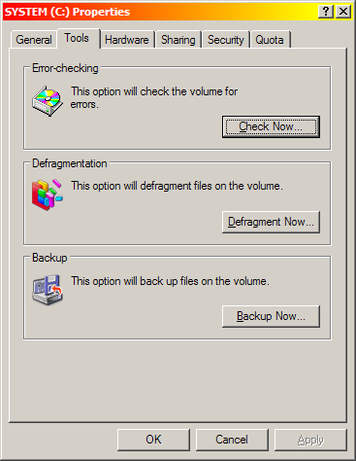
From the dialogue box, choose the Tools tab
Error Checking
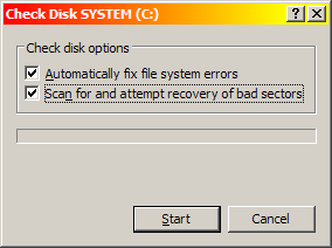
The Check Disk program makes sure that Windows is storing files to the hard disk correctly. Because it literally checks where every file is stored, this process can take a very long time. You might want to do this over night, or save this for some time when no-one is going to be using your PC
From the Tools Tab, choose the Check Now button. The following dialogue box pops up.
Defragmentation
When Windows stores a file on the hard drive, it’s not saved in a single piece. Windows breaks a file up into many small parts and fits them onto the available space of the hard disk as best it can. This way the empty space on a hard drive is used as efficiently as possible.
The only disadvantage of this process is that as a hard drive becomes more full, windows may have to scatter the parts of various files further about, as large areas of free space start to become harder to find. This is called “fragmentation”. Fragmented files take longer to load up and cause more wear and tear on the mechanism of the hard drive.
Defragmenting aims to try and reorganize the files on the hard disk so their parts are closer together, making the drive more efficient.
To run Windows Defragmenter
Defragmentation can sometimes take time to complete, especially if you have a large hard disk that is fairly full. You also want to make sure that your drive is not more that 80% full, as Defragmenter may not have enough “room” to operate.
Right click on the drive, choose Properties from the menu, click on the Tools tab.
Click on Defragment Now.
Highlight your C drive. Click on Analyse. Windows will can your disk and report back. Usually it will say that your drive does not need to be defragmented, but you can ignore this and defrag anyway – it will still improve the performance of your computer.
Clicking the Defragment button will begin the defragment process.
If you want to perform a Check Disk and a Defrag, do the Check Disk first.
The Master Slide is the design template or design theme used for the slides within your presentation. There are four different master slides title master, notes master, handout master and the most common, the slide master. Master Slides reduce the time it takes to format your presentations.
When creating a Master slide, you would generally create a background to be used, select the fonts and formats of the text to be used in the PowerPoint and select the slide transitions.
To create a master slide open Microsoft PowerPoint 2007 and click on the View tab on the ribbon and then Slide Master.
The Ribbon window below will display.
As you can see you are given all of the different slide layouts on the left hand side of the window. You can see in the image above that we have applied a background to three of the slide layouts.
When placing images like the Otago Polytechnic swirl on your slides these will not be able to be edited or moved in the standard slide creator view. (This is great if you do not want people to mess around with the designs of your PowerPoints).
Once you have created your background design you can format the text to your desired color, size and style. To do this simply click on the text that you wish to edit (remember slide masters acts as a design template so do not enter your content) and click on the Home tab, then format your text accordingly.
To apply transition effects between slides simply click on the slides and apply transitions as you normally would.
Once you have your design of your PowerPoint complete click on Close Master View on the master ribbon.
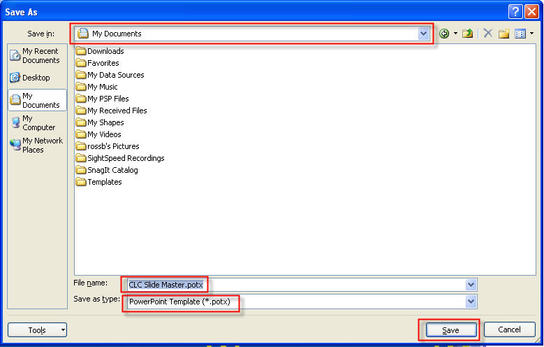
You are now ready to save your newly created master slide design as a template so you can use it in the future.
Click on the Office button on the ribbon
Click Save As
The Save As dialog box below will appear
Ensure you have the file destination correct for where you want to save the PowerPoint Template
Type is a File Name
Select PowerPoint Template (*.potx)
Click Save
You now successfully created a master slide template that you can use for future PowerPoint presentations
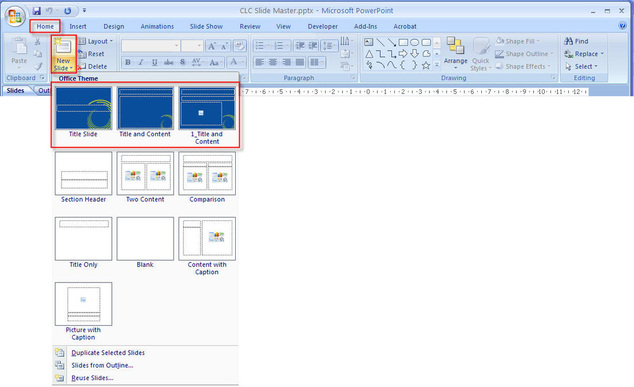
Using Master Slide Designs
Open your PowerPoint Template you just created
Click the Home tab
Click New Slide, you will notice the new design options appear in your new slide options
Click on the desired slide layout and start entering your content
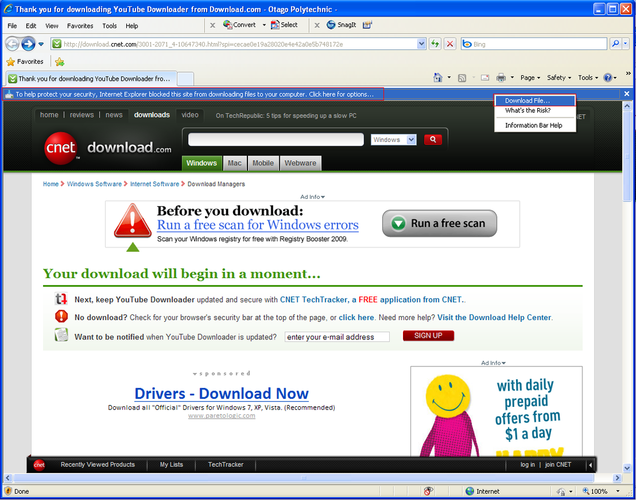
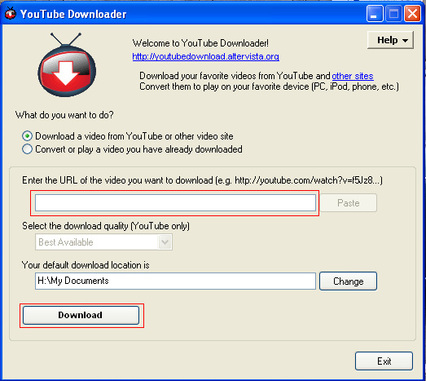
This Youtube Downloader is a great tool for downloading you tube video clips directly to your computer so you can view them offline. Download InstructionsNavigate to this site http://download.cnet.com/YouTube-Downloader/3000-2071_4-10647340.html Click on Download Now The web page below will display, click on the warning message along the top of the website and click "download file"
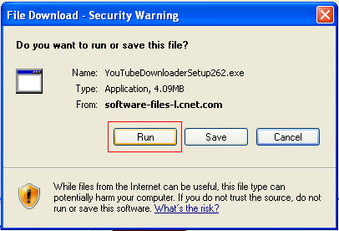
The Run box below will display, click on Run
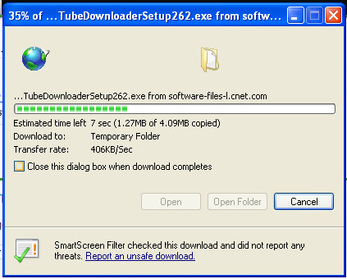
The executable file will now download onto your system, Click open once this is complete
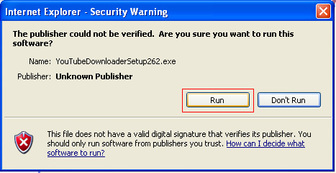
A second run box will open, Click on Run
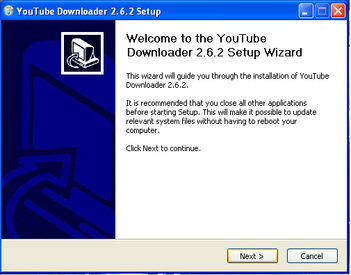
The Download Wizard will now open click on Next to start the wizard
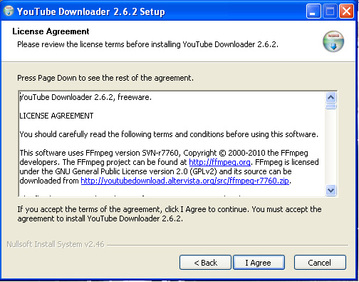
The terms and conditions will now be displayed as shown below, read these then click I Agree
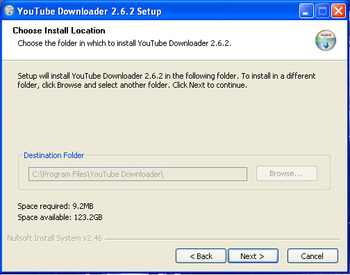
You will now be shown where the file will be downloaded to. Click Next
You will now be prompted with installing the Yahoo search bar and setting Yahoo as your home page. To avoid this deselect both tick box's and click next
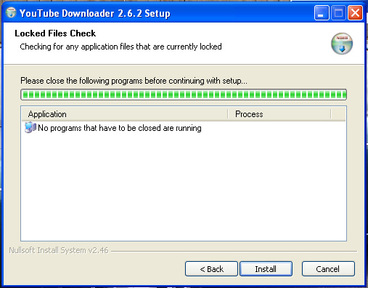
The File is now ready to to install, Click on Install
The Youtube Downloader will now install, once it is finished click on Finish and you will see the Youtube Downloader Open as shown below
How to use the Youtube DownloaderGo to www.youtube.comSearch your videoClick in the Address bar and copy the URL Minimize your web browser and click into the first box of the Internet Downloader and click pasteCheck the destination of where you are saving your video Click Download
Twitter is becoming a widely used marketing tool for businesses today. Here are a few tips to get your business started on Twitter.
First Steps - Build an account and immediate start using Twitter Search to listen for your name, your competitor’s names, words that relate to your space. (Listening always comes first.)
- Add a picture. We want to see you.
- Talk to people about THEIR interests, too. I know this doesn’t sell more widgets, but it shows us you’re human.
- Point out interesting things in your space, not just about you.
- Share links to neat things in your community.
- Don’t get stuck in the apology loop. Be helpful instead.
- Be wary of always pimping your stuff. Your fans will love it. Others will tune out.
- Promote your employees’ outside-of-work stories.
- Talk about non-business
- Remember that there is a human behind the computer
Ideas About What to Tweet - Instead of answering the question, “What are you doing?”, answer the question, “What has your attention?”
- Have more than one twitterer at the company. People can quit. People take vacations. It’s nice to have a variety.
- When promoting a blog post, ask a question or explain what’s coming next, instead of just dumping a link.
- Ask questions. Twitter is GREAT for getting opinions.
- Follow interesting people. If you find someone who tweets interesting things, see who she follows, and follow her.
- Tweet about other people’s stuff. Again, doesn’t directly impact your business, but makes us feel like you’re not “that guy.”
- When you DO talk about your stuff, make it useful. Give advice, blog posts, pictures, etc.
- Share the human side of your company. If you’re bothering to tweet, it means you believe social media has value for human connections. Point us to pictures and other human things.
- Don’t toot your own horn too much. (Man, I can’t believe I’m saying this. I do it all the time. – Side note: I’ve gotta stop tooting my own horn).
- Or, if you do, try to balance it out by promoting the heck out of others, too.
Things to Remember- Building a network of followers takes time
- Follow people who interest you or your organisation
- Post interesting, attention capturing tweets
- Give it time, you cannot force people to follow your business
Follow Otago Polytechnic Community Learning Centres on Twitter at OTAGOPOLYCLCS
Tips for using the popular social networking site Facebook.
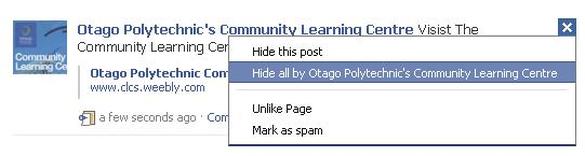
Liking groups and fan pages is very popular on facebook. However It quickly gets annoying seeing some users posts, game invites, polls, etc. Hovering your mouse to the right of the post and clicking the X button as shown below can hide any post. Once this button is pressed you'll be prompted with the option to "hide this post" or "hide all by Otago Polytechnic's Community Learning Centre". This will hide all the posts from this application appearing on your page.
If you wish unhide someone or unblock an application click the Edit Options link in the bottom right corner of the news feed as shown below. Update your privacy settings
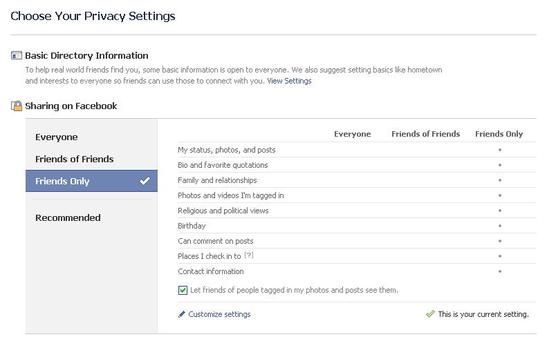
Click Account in the top right corner of the Facebook window and then click Privacy settings to adjust who is capable of seeing what on your Facebook profile. We highly recommend going through all the privacy settings to verify your privacy is properly protected.
Anything that is not set to friends only or friends of friends can be seen by anyone searching on the Internet. Below is a few things we recommend for most users. As you can see you have the options of allowing everyone to view your profile, this is strongly not recommended as Facebook contains your personal information. You will be opening yourself up to the possiblity of identiy theft and other dangerous implications. We would recommend that you set your privacy settings to "Friends Only".
Use the Facebook top bar for navigation
Knowing how to properly navigate is vital if you want to get the most out of Facebook. Below is a brief description of each of the available options in the top bar as shown above.
Home (facebook logo) - Clicking this logo will take you to your wall (News Feed) that shows all friends recent posts.
Friend requests - If any friend requests are waiting to be approved this icon will show a notification of how many friends are waiting for approval. This icon can also be clicked when you want to view any friend recommendations or search for friends on Facebook.
Messages - This section allows you to send and receive private messages between one or more people you're friends with.
Notifications - Any time a friend or Facebook application creates a new post you'll be notified in this section. Clicking this icon will show all recent notifications. If you wish to change what is capable of sending you notifications including any Facebook applications or games click the See All Notifications link at the bottom and check or uncheck what you want to be notified on.
Search - Finally, the search box in Facebook can be a powerful tool that can be used to quickly find any current friends or people on Facebook. In addition searching for terms such as a company name, product, sports team, music band, etc. will find fan pages and groups that can be joined.
Modify your account notifications
Keep your e-mail and/or your cell phone clean by updating or eliminate Facebook notifications or keep more up-to-date by adding new notifications. Facebook notifications can be added and removed by clicking Account link in the top right corner, then Account Settings, and then clicking the Notifications tab.
Top News and Most Recent
By default Facebook will display your wall postings in the News format, which means it only displays posts it believes are most relevant to you. These results are based on your past interaction with your friends. If you want to see every post made by all your friends that are not hidden click the Most recent link in the upper right section of your news feed as shown in the above picture example.
If you want to adjust who shows up manually click the Edit Options in the bottom right corner of your news feed. View High School work friends
If you've added your High School and/or previous Work locations to your profile, quickly see all classmates and co-workers on Facebook by clicking the link in your Info tab under your profile.
Quickly change profile picture
Your profile picture can be quickly changed to any other picture by visiting your profile, hovering the mouse over your current profile picture, and clicking the Change Picture link that appears in the top right corner of the picture.
Don't post private information on friend's walls on in comments
When you make a post on a friend's wall or in any of their comments realize that any of their friends are going to be able to see that post. If you wish for something to remain only between you and a friend send them a Facebook message instead.
Suggestions and random friend invites
As you get more friends on Facebook it will begin making friend, groups, and fan suggestions. These are suggestions made by Facebook and not your friends. Unless these are something you're interested in they can be ignored.
This same rule can be applied to people who may want to be your friend that you don't know. If you don't know someone don't accept his or her friend invite. Once someone becomes your friend they'll have access to any information your friends are capable of seeing.
Tag your Facebook friends in your photos
Always make sure to tag any of your Facebook friends that are in pictures you upload. However, never tag someone who is not in the picture. When someone is tagged in a photo that picture is automatically added to that persons profile and is a great way to share pictures with all friends.
|


 RSS Feed